Monday, January 30, 2012

Sweet Potato Gnocchi with Brown Butter and Sage

Before we go any further, let me state that this recipe is NOT diet-friendly. It’s flat out full of butter, cheese and goodness. So have some with a salad and pat yourself on the back for having veggies.

I’ve never made gnocchi until finding this recipe. My gnocchi didn’t turn out as pretty as the magazine photo but they sure did taste good. The gnocchi also freeze quite well and since this recipe makes quite a bit, you can freeze some for another time. I set the raw gnocchi on a baking sheet in the freezer, then once it's frozen you can transfer the gnocchi to a ziploc bag. No need to defrost - just throw them into boiling water when you're ready.  The recipe is from the December 2005 issue of Bon Appetit. 

Sweet Potato Gnocchi with Brown Butter and Sage
Makes 10 to 12 servings

2 1-pound red-skinned sweet potatoes, rinsed, patted dry, pierced all over with fork

1 12-ounce container fresh ricotta cheese, drained in sieve 2 hours
1 cup finely grated parmesan cheese (about 3 ounces)
2 tablespoons (packed) golden brown sugar
2 teaspoons plus 2 tablespoons salt
½ teaspoon freshly ground nutmeg
2 ¾ cups (about) all purpose flour
1 cup (2 sticks) unsalted butter (way too much butter, only 1 stick is needed)
6 tablespoons chopped fresh sage plus whole leaves for garnish

Line large baking sheet with parchment paper. Place sweet potatoes on plate; microwave on high until tender, about 5 minutes per side. Cut in half and cool. (Make sure the potatoes are completely cool - they will absorb less flour) Scrape sweet potato flesh into medium bowl and mash; transfer 3 cups to a large bowl. Add ricotta cheese; blend well. Add parmesan cheese, brown sugar, 2 teaspoons salt, and nutmeg; mash to blend. Mix in flour, about ½ cup at a time, until soft dough forms.

Turn dough out onto floured surface; divide into 6 equal pieces. Rolling between palms and floured work surface, form each piece into 20-inch-long rope (about 1 inch in diameter), sprinkling with flour as needed if sticky. Cut each rope into 20 pieces. Roll each piece over tines of fork to indent. Transfer to baking sheet.

Bring large pot of water to boil; add 2 tablespoons salt and return to boil. Working in batches, boil gnocchi until tender, 5 to 6 minutes. Transfer gnocchi to clean rimmed baking sheet. Cool completely. (Can be made 4 hours ahead. Let stand at room temperature)

Preheat oven to 300°F. Melt butter in heavy large saucepan over medium-high heat. Cook until butter solids are brown and have toasty aroma, swirling pan occasionally, about 5 minutes.

Add chopped sage (mixture will bubble up). Turn off heat. Season sage butter generously with salt and pepper.

Transfer half of sage butter to large skillet set over medium-high heat. Add half of gnocchi. Sauté until gnocchi are heated through, about 6 minutes. Empty skillet onto rimmed baking sheet; place in oven to keep warm. Repeat with remaining sage butter and gnocchi.

Mangia Mangia!

To Veg or Not to Veg?

Luckily with this recipe you can do both!  This recipe was given to me by a former co-worker who I fell out of touch with when I moved from NYC to Baltimore. So if Kevin Kavanagh ever googles his name, maybe he’ll find me here. He and his fiancée made it and thought it was so good he shared the recipe with me. It’s from the Best of Cooking Light’s Classics and perfect for a cold night. The recipe calls for prosciutto and chicken broth, but I made it vegetarian by omitting the ham and using a mixture of vegetable broth & white wine. I made this for a dinner with my vegetarian neighbor and we both deemed it a success!

White Bean and Sage Cassoulet
6 servings

2 teaspoons olive oil
1 cup diced carrot
1 cup chopped fennel bulb
1 cup diced onion
6 garlic cloves, minced
¼ cup fat-free, less-sodium chicken broth (or use vegetable broth or white wine)
2 tablespoons thinly sliced fresh or 2 teaspoons dried rubbed sage
½ to 1 teaspoon freshly ground black pepper
4 ounces thinly sliced prosciutto or ham (omit if you want to)
2 16-ounce cans cannellini beans or other white beans, drained
1 14.5-ounce can peeled tomato wedges (I used diced tomatoes since that’s what was in my pantry)
2 1-ounce slices diagonally cut French bread (about 1 inch thick) (I cut up enough bread crumbs to cover the dish)
Cooking spray
Sage leaves (optional)

  1. Preheat oven to 425°.
  2. Heat oil in a large nonstick skillet over medium-high heat. Add carrot, fennel, onion, and garlic, and sauté 5 minutes. Stir in broth and next 5 ingredients (broth through tomatoes). Spoon carrot mixture into an 11x7 inch baking dish.
  3. Trim crusts from bread, and cut bread into 1-inch cubes. Lightly coat cubes with cooking spray. Arrange bread cubes in a single layer over carrot mixture, pressing cubes gently into mixture. Cover with foil and bake for 25 minutes. Uncover cassoulet, and bake for an additional 5 minutes or until the croutons are golden brown. Garnish with sage leaves, if desired.

Thursday, January 26, 2012

Onion-Cheese Puffs

I am on email lists for quite a few food websites and magazines. One of my favorites is SAVEUR. I even love James Oseland, the Editor-in-Chief, who has also been a judge on Top Chef: Masters. He’s terrific. I think I received an email over the holidays with menu ideas and suggestions. I printed out this recipe on 11/15/2010, probably in anticipation of making these for Thanksgiving. They are SO easy and SO simple and SO delicious. It’s gotten to the point where I just eyeball the ingredients when I make a batch.


Onion-Cheese Puffs
Serves 8-12

Author and SAVEUR contributing writer Peggy Knickerbocker gave us the recipe for these simple hors d’oeuvres – among her fondest childhood memories of the elaborate holiday dinners her family hosted.

½ small yellow onion, peeled and finely chopped
½ cup mayonnaise
3 tablespoons freshly grated parmigiano-reggiano (I'll admit - sometimes I use the Kraft stuff in the green container if it's all I have)
2 tablespoons fresh parsley, finely chopped
Sea salt and freshly ground pepper
8 slices of white bread

  1. Preheat oven to 350°. Mix onion, mayonnaise, parmigiano-reggiano, and parsley in a medium bowl. Season with salt and pepper.
  2. Remove crusts from the bread. Using a 1” round cookie cutter, cut bread into 32 rounds. (I just cut off the crusts and cut each slice of bread into quarters) Place on a cookie sheet and bake, without turning, until golden, 10-15 minutes.
  3. Preheat broiler. Spread about 1 tsp. onion mixture onto each round, then sprinkle with more parmigiano-reggiano and brown under broiler for 1-2 minutes. Serve immediately (preferably with a glass of wine or cocktail).


Nom Nom Nom

Suck it, Manwich!

This is a recipe I make 2 or 3 times a year when we’re craving something old school for dinner. My generation grew up eating Manwich Sloppy Joes or Sloppy Joes from the school cafeteria, which as kids we probably thought were great, but who says they can’t be a bit more refined? And why is it called a MANwich?  How sexist!

This recipe from the October 2007 issue of Gourmet (R.I.P.) shows that they CAN be sophisticated and delicious, without using processed sauce.  I like to add a little bit of shredded cheese, too. We had these open faced with some oven baked sweet potato fries.


Sophisto Joes
Serves 4
Active Time: 25 minutes
Start to Finish: 35 minutes

These are the Jay Gatsbys of sloppy joes – suave, debonaire. But we’d be remiss if we let the black-tie frippery of these cosmopolitan joes belie their true nature: Just as with Fitzgerald’s famous hero, there’s substance underneath all that class. These civilized sandwiches are hearty, delicious, and perfect for a weeknight dinner.

1 14.5 ounce can whole tomatoes in juice, drained
1 large onion, chopped
4 garlic cloves, finely chopped
2 tablespoons unsalted butter
1 medium carrot, finely chopped
1.5 lbs ground beef chuck
1 tablespoon chili powder
1 teaspoon ground cumin
½ cup dry red wine
2 tablespoons Worcestershire sauce
1.5 tablespoons packed brown sugar
4 kaiser rolls, split

1.                  Puree tomatoes in a blender
2.                  Cook onion and garlic in butter in a 12-inch heavy skillet over medium-high heat, stirring occasionally, until onion begins to brown, 4 to 5 minutes. Add carrot, celery, and ½ teaspoon salt and cook, stirring occasionally, until vegetables are softened, 4 to 5 minutes.
3.                  Add beef and brown, stirring to break up lumps, 5 to 6 minutes. Add chili powder, cumin, ½ teaspoon salt, and ¾ teaspoon pepper and cook, stirring, 2 minutes. Add pureed tomatoes, wine, Worcestershire sauce, and brown sugar and boil, stirring occasionally, until sauce has thickened, about 6 minutes. Season with salt and sandwich inside rolls.


I dare you to not sing the Lunch Lady song by Adam Sandler!
Sloppy Joe, Slop, Slop-py Joe.....


Wednesday, January 25, 2012

Smoky Braised Chicken and Gnocchi

My friend Lori flew to Colorado yesterday for some R&R in Breckenridge. She stayed with us last night and one of the reasons she wanted to stay was to have a meal made by me. NO pressure there, right? Since it was a weeknight and I had to work I found this recipe in the binder that looked to be fairly easy and quick.  It was good but I haven’t decided yet if it’s going in the “keep” pile or not. At least our guest was happy. I served it with some salad and steamed broccoli. Dessert was Chocolate Stuff (recipe to follow) with Earl Grey ice cream.  This recipe is from the December 2007 edition of Real Simple Magazine.

Smoky Braised Chicken and Gnocchi
Hands-on time: 10 minutes
Total time: 1 hour
Serves 4

4 chicken legs (drumsticks and thighs)
Kosher salt & pepper
1 tablespoon olive oil
4 cups low-sodium chicken broth
1 tablespoon smoked or hot paprika (I used smoked)
2 yellow onions, cut into wedges
1 pound gnocchi (refrigerated or shelf-stable)

Heat oven to 400°.  Pat the chicken dry with a paper towel and season with 1 teaspoon salt and ½ teaspoon pepper. Heat the oil in a large ovenproof saucepan (I used my Le Creuset dutch oven) over medium high heat. Add the chicken, skin-side down, and cook until the skin is crisp, about 5 minutes (I had to do this in two batches). Turn the chicken and add the broth, paprika, and onions. Transfer to oven and cook, uncovered, for 30 minutes. Add the gnocchi and continue cooking until the gnocchi are cooked through, about 15 minutes. Divide among individual plates.


The Best Thing You'll put in Your Mouth All Week, I Promise You

This recipe comes from the book, “The Sweet Potato Queens’ Book of Love”. My former co-worker Mary gave me this to read and I copied some recipes from it. Not sure how long I’ve had it but Mary and I worked together from 2001-2003 so it has been a while. The recipe is in the chapter “What to Eat when Tragedy Strikes” and is good for what ails you. The beauty of it, too, is you’ll probably have all of the ingredients on hand and can whip it up whenever you need a dose of chocolate.  Here is the recipe as written in the book:

Chocolate Stuff

Beat two eggs with a cup of sugar and ½ cup of flour.  Add ¼ teaspoon of salt. In the microwave melt together one stick of real butter (I never use unsalted; I think it tastes flat) and 2 fairly heaping teaspoons of Hershey’s cocoa. Get regular Hershey’s in the dark brown box – anything else is different and will screw it up. Dump the butter-cocoa mixture into the other things, and stir it up good. Then add a running-over teaspoon of vanilla. I use the real vanilla, but the grocery store kind won’t ruin it. Stir that up, too. If you decided to go for nuts, use a whole bunch of pecans, chopped up fine.

Pour the Stuff into a greased loaf pan, set the loaf pan in a pan of water, and stick the whole business in the oven set at about 300 degrees. Depending on how your oven cooks, it needs to stay in there for 40 to 50 minutes. You can reach in there and tap on the top of it at 40 minutes. If it seems crunchy, I’d take it out. You can’t really undercook it, since it’s good raw, but you don’t want to overcook it and lose the gooey bottom so crucial to the whole texture experience.

Trust me. This will be the best thing that has happened to you in a very long time, possibly ever. From now on, for as long as you live, just the simple act of getting out the bowl to make Chocolate Stuff will have an incredibly assuaging effect on your psyche. I can say, without fear of contradiction, there is virtually nothing, not one situation, that can’t be faced with calm and grace and serenity if you have Chocolate Stuff. You can eat it and feel better fast, and when it wears off, you can just make another batch. Believe me, in no time at all, you’ll be grinning like a mule eating briars.

Sunday, January 22, 2012

Rosemary Garlic Chicken

This recipe is one I’ve made a few times in the past. It’s very easy for a weeknight meal and I usually have all of the ingredients on hand.  This recipe is from the February 2003 issue of Real Simple magazine. I tend to have pretty good success with recipes from Real Simple. I think I’ve been a subscriber since the magazine debuted and always find something good in each issue.


Rosemary-Garlic Chicken
Preparation Time: 10 minutes
Cooking Time: 20 minutes

4 boneless, skinless chicken-breast halves (I use 2)
1 tablespoon olive oil
2 garlic cloves, peeled and cut in half lengthwise
1 teaspoon kosher salt
Freshly ground black pepper
½ cup sherry vinegar (I’ve used plain cooking sherry and sherry vinegar, both with success)
½ cup low-sodium chicken broth
1 tablespoon fresh rosemary leaves or 1 teaspoon dried rosemary
1 tablespoon unsalted butter

Using a rolling pin, pound the chicken between 2 sheets of wax paper until they are of uniform thickness. Heat the oil and garlic in a large skillet over medium-high heat until the oil shimmers and the garlic browns. (Don’t burn the garlic)  (I add the garlic towards the end of cooking the chicken so as not to burn) Add the chicken breasts and cook until golden, 3 to 5 minutes on each side. Add the salt, pepper, vinegar, chicken broth, and rosemary. Cover, reduce heat to medium-low, and cook 3 minutes longer or until the chicken is fork-tender. Remove the chicken to a platter and keep warm. Increase heat to high and boil the sauce until thickened or syrupy, 3 to 5 minutes. (this always takes longer for me since I live at 8,500’ elevation) Whisk in the butter and pour the sauce over the chicken.

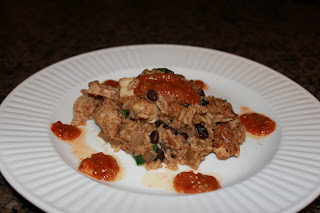
Arroz Rojo con Pollo y Frijoles Negros (Chicken and Rice with Black Beans)

This is a recipe I found on the world wide interwebs and have no idea why or what I was searching for when I found it. I printed it out on 1/26/10 and it’s been in my binder untouched ever since. That’s one of my problems and why I’m on a mission to cook my way through my binder – I print out random recipes because they sound good to me at the time and then I don’t make them! After making this I’m kicking myself it took me 2 years to make it because it is SO GOOD.

I pulled this off of the website www.weheartfood.com .  According to them, the recipe is based on one in Rick Bayless’s Mexican Everyday cookbook. And in my eyes, Rick Bayless can do no wrong. I love that man. I love his cooking, his personality, his attitude, his graciousness, his restaurant, his PBS show, everything. There is a reason he was the first Top Chef Master. He’s that awesome.

The chicken, rice & beans is a tad bit boring. What makes the dish is the Smoky Chipotle Salsa that you spoon over it. It elevates a humble dish to new heights, which may sound a bit hyperbolic, but I’m serious. With the salsa, this dish goes from a 3 to an 11. Because the salsa has chipotles en adobo it’s a bit spicy but the rice and beans totally mellow it out (dude).

The salsa has tomatillos in it. This was my first time ever working with these crazy little tomato looking things. They are covered in a husk which is attached with what I’m guessing is nature’s glue – some kind of sticky stuff that washes off in warm water. They look like green tomatoes but don’t taste like them.  It’s hard to describe but the tomatillos added a bright, almost citrusy (zingy maybe?) element to the salsa.


Chicken and Rice with Black Beans

2 tablespoons vegetable oil
1 ½ pounds boneless skinless chicken breasts (I used 2 breasts and it was plenty)
Salt
2 ½ tablespoons ancho chile powder
1 medium white onion, cut into ¼-inch pieces
1 cup rice
5 garlic cloves
1 ½ cups chicken broth
1 15-ounce can black beans, rinsed and drained
¼ cup chopped green onions
Cilantro to garnish
Smoky Chipotle Salsa (see below)

The ingredients

Heat the oil in a large pot (I used my smallish Le Crueset) over medium-high heat. Salt the chicken breasts, then sprinkle both sides with 1 tablespoon of the ancho chile powder. Lay them in the hot oil to brown, about 3 minutes on each side. Remove from the pot and set aside. Leave the oil in the pan. Add the rice and onion, and stir for 4-5 minutes or until the rice starts to look dry and opaque. Add the garlic and the remaining chile powder and stir for another minute. Add the broth and up to a teaspoon of salt, and stir well. Bring to a boil, lower the heat to medium-low, cover and let cook for 10 minutes.


Cut the chicken breasts into 1-inch cubes, uncover the pot, and add the chicken and beans.
Re-cover the pot and cook for an additional 12 minutes.

Uncover, stir in the green onions, then remove from the heat and let it sit, covered, for 5 to 10 minutes.

Garnish with cilantro, and serve with smoke chipotle salsa.


Smoky Chipotle Salsa

4 garlic cloves
4 medium tomatillos, husked, rinsed, and cut in half
2 canned chipotle peppers
Salt

Set a large skillet over medium-high heat, and add the garlic and tomatillos, cut-side down. When the tomatillos are browned, after 3-4 minutes, turn everything over and brown the other side.

Tomatillos & Garlic make for a zesty salsa

Add the garlic, tomatillos, chipotle peppers, and ¼ cup water to a blender and puree. Add salt to taste.


Dinner is served!


Dijon Pork Loin (or how to ruin a perfectly good pork tenderloin)

This is a recipe I pulled out of the February 2007 issue of Southern Living Magazine.  WHY or HOW I came to have this magazine in my possession I have no idea.  This recipe was on a page entitled “Six-Ingredient Entrees” which probably caught my eye because less ingredients usually means easier prep. Well let me tell you. This. Was. Awful. The recipe was submitted by a reader (whose name I won’t post to protect their reputation) and it calls for 4 Tablespoons of steak seasoning. The Southern Living test kitchen recommended using McCormick Grill Mates Montreal Steak Seasoning. Great, we have some in our pantry and it’s tasty on steak - when used judiciously.  The seasoning has a lot of salt and 4 tablespoons is far too much. Unfortunately we didn’t realize this until it was time to take a bite. UGH. A salt lick would have been more appetizing. Luckily I made some texmati rice and a bite of pork with the plain rice cut down on the saltiness.

This recipe goes in the discard pile.

Dijon Pork Loin
Makes 6 to 8 servings
Prep: 10 min.; Bake: 1 hr., 15 min.; Stand: 15 min.

4 tablespoons steak seasoning
2 tablespoons all purpose flour
¼ cup butter, melted
2 tablespoons Dijon mustard
1 (3 ½ to 4 lb) boneless pork loin roast, trimmed
Garnishes: fresh basil leaves, cherry tomatoes (I did not garnish)

1. Combine first 4 ingredients in a small bowl. Rub mustard mixture evenly over roast. Place roast on an aluminum foil-lined broiler pan.

    The pork before cooking
2. Bake at 475° for 20 minutes. Reduce heat to 350°, and bake 50 to 55 more minutes or until a meat thermometer inserted in thickets portion registers 155°. Remove from oven, and let stand 15 minutes or until thermometer reaches 160° before slicing. Garnish, if desired.


Served with some texmati rice & steamed broccoli


Friday, January 20, 2012

Earl Grey Ice Cream

It’s Friday night and I’m a ski widow. My neighbor Rebecca is in the same boat as me, so she and her dog Sadie are coming over for dinner and (lots of) wine. Rebecca is a vegetarian so I’m preparing a dinner of salad and a white bean & vegetable cassoulet from Cooking Light.  Since we are saving calories on the entrée, I figured why not make a decadent dessert? Martha never steers me wrong in the dessert category and I’m making Molten Chocolate Cakes served with Earl Grey Ice Cream. Perhaps a bottle of champagne will be uncorked as well?

I have the ice cream maker attachment for my Kitchen-Aid mixer and LOVE it. Maybe I love it a little bit too much if my tightish jeans are any indicator….

On a completely random note, Earl Grey was an answer to a Double Jeopardy question posed to me when I was a contestant on the show in 1998. Yes, I got it right.


Earl Grey Ice Cream
Makes about 5 cups
From Martha Stewart Living, February 2002

Note: Two tablespoons of loose tea leaves may be substituted for the tea bags in this recipe. If you use loose tea, you will need to strain the tea mixture before combining it with the egg yolks.

8 large egg yolks
½ cup sugar
2 cups milk
2 cups heavy cream
4 Earl Grey tea bags (I used Bigelow brand)

  1. Prepare an ice bath and set aside.  Combine the egg yolks and sugar in the bowl of an electric mixer fitted with the whisk attachment, and beat until pale yellow and very thick, 3 to 5 minutes.
  2. Place the milk, cream and tea bags in a medium saucepan, and bring mixture to a boil. Remove from heat; cover, and let steep for 10 minutes. Remove the tea bags, and return the mixture to a boil. Gradually pour half of the milk mixture into the egg yolk mixture, whisking constantly. (I do this very slowly and start with a spoonful at a time so as not to scramble the eggs.) Return the combined mixture to the saucepan.
  3. Cook combined mixture over medium-low heat, whisking constantly (I just stirred with a silicone spatula until thickened), until thick enough to coat the back of a spoon. Strain the mixture into a bowl set in the ice bath, and chill completely. Freeze in an ice cream maker, according to the manufacturer’s instructions, until the ice cream just holds its shape. Transfer the ice cream to a metal loaf pan, cover with plastic wrap, and freeze until firm, at least 2 hours.
A photo of the ice cream with a Molten Chocolate Cake:

Monday, January 16, 2012